How I got this picture - Andrew Orr Posted On 8th February 2018 To How I got this picture

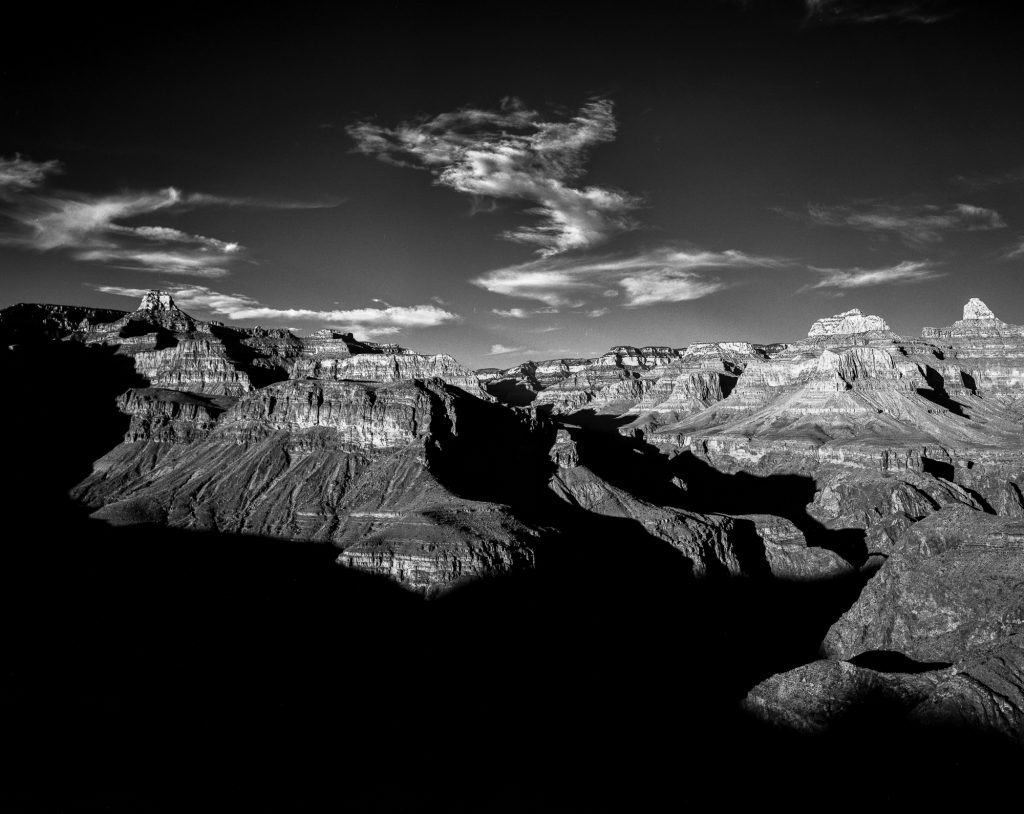
The Grand Canyon at Plateau Point
Technical info
Film Used: ILFORD FP4+
Format: 4x5
Camera: Wista 45DX
Lens: Rodenstock: 90mm f/4.5
Exposure time: 1/60th
Other equipment: Red filter
Location:
Plateau Point, Grand Canyon National Park
Firstly, tell us the story behind this image. What inspired you to shoot it?
One weekend at the last minute I decided to do a full moon hike to Plateau Point in the Grand Canyon. My plan was to hike down around noon, enjoy the sunset, and then hike out once the full moon rose and lit the trail.
I had recently started shooting large format so naturally I wanted to take my new 4x5 into the Grand Canyon. I have a new passion for hiking into remote areas where most people wouldn’t want to take such a heavy camera. This hike seemed to qualify as it was a 12.5-mile hike (round trip) with 3,000 feet of elevation gain on the way out.
When I first reached the bottom, I saw some beautiful wispy clouds on the horizon above the tributary canyon seen in the picture. Since I am relatively new to concentrating on black and white photography, I knew that a red filter would help darken the sky and make the clouds pop out so I shoot the first picture with and without the red filter. When I developed the picture later on it was obvious the red filter helped create the dark sky I was after for this photograph. The hike out of the canyon was quite painful as I had taken 45 pounds of camera equipment with me including the 4x5 camera and a few digital cameras and lenses.
My inspiration for shooting large format photographs in environments like this comes from some of the early photographers that documented what they saw in the southwest with large format cameras. As much as I struggle hiking with just a 4x5 camera, I can’t imagine the work that went into shooting these locations with larger camera systems.
Did you come across any challenges?
The hike out of the canyon was particularly challenging with as much camera equipment as I had with me. I’ve also learned that I’m not confident with my exposure on film, yet,. I always fear the risk of not having a decent printable negative after developing the film. Also, of course, the idea of something going wrong with developing the negative was very concerning to me.
What process did you use
I used a tripod and set the camera up as soon as I reached my shooting location. While being questioned by a few hikers as to what in the world I was using. I took a few pictures of the view with different lens/filter combinations.
How did you process it?
I processed the film with a Stearman Press SP-445 developing system with Kodak D-76 developer and Kodak fixer.
What about printing?
I printed the photograph with a Beseler 45MX enlarger and Rodenstock lens.
Which paper did you use and what was your printing process?
I printed the final photograph with a Beseler 45MX and pearl 8x10” Ilford multigrade paper. The base exposure was ~23 seconds with a three second burn on the sky.
About The Author

Andrew Orr
I have been interested in photography as a hobby for the past 14 years. I first learned on my parents’ Nikon FM shooting 35mm film while studying geology in college. After graduating I bought my first DSLR and shot digitally for many years. Since then I’ve moved back towards film and now shoot medium format on a Hasselblad 500C and large format 4×5 with a Wista 45DX. When possible, I combine photography with my other hobbies: technical diving, traveling, hiking, caving, and canyoning.
Website: http://www.andrew-orr.com
Instagram: https://www.instagram.com/rockbiter2/


