How I got this picture - Jamie Fitzel Posted On 22nd January 2019 To How I got this picture

Mindtraveller

Technical info
Film Used: ILFORD HP5+ (pushed to 3200)
Format: 120, shot as 6x7
Camera : Mamiya RB67 Pro SD
Lens: Sekor 50mm f4.5
Exposure time: 20 minutes
Other equipment: Tripod
Location: Norman Wells, Northwest Territories, Canada
Tell us the story behind this image. What inspired you to shoot it?
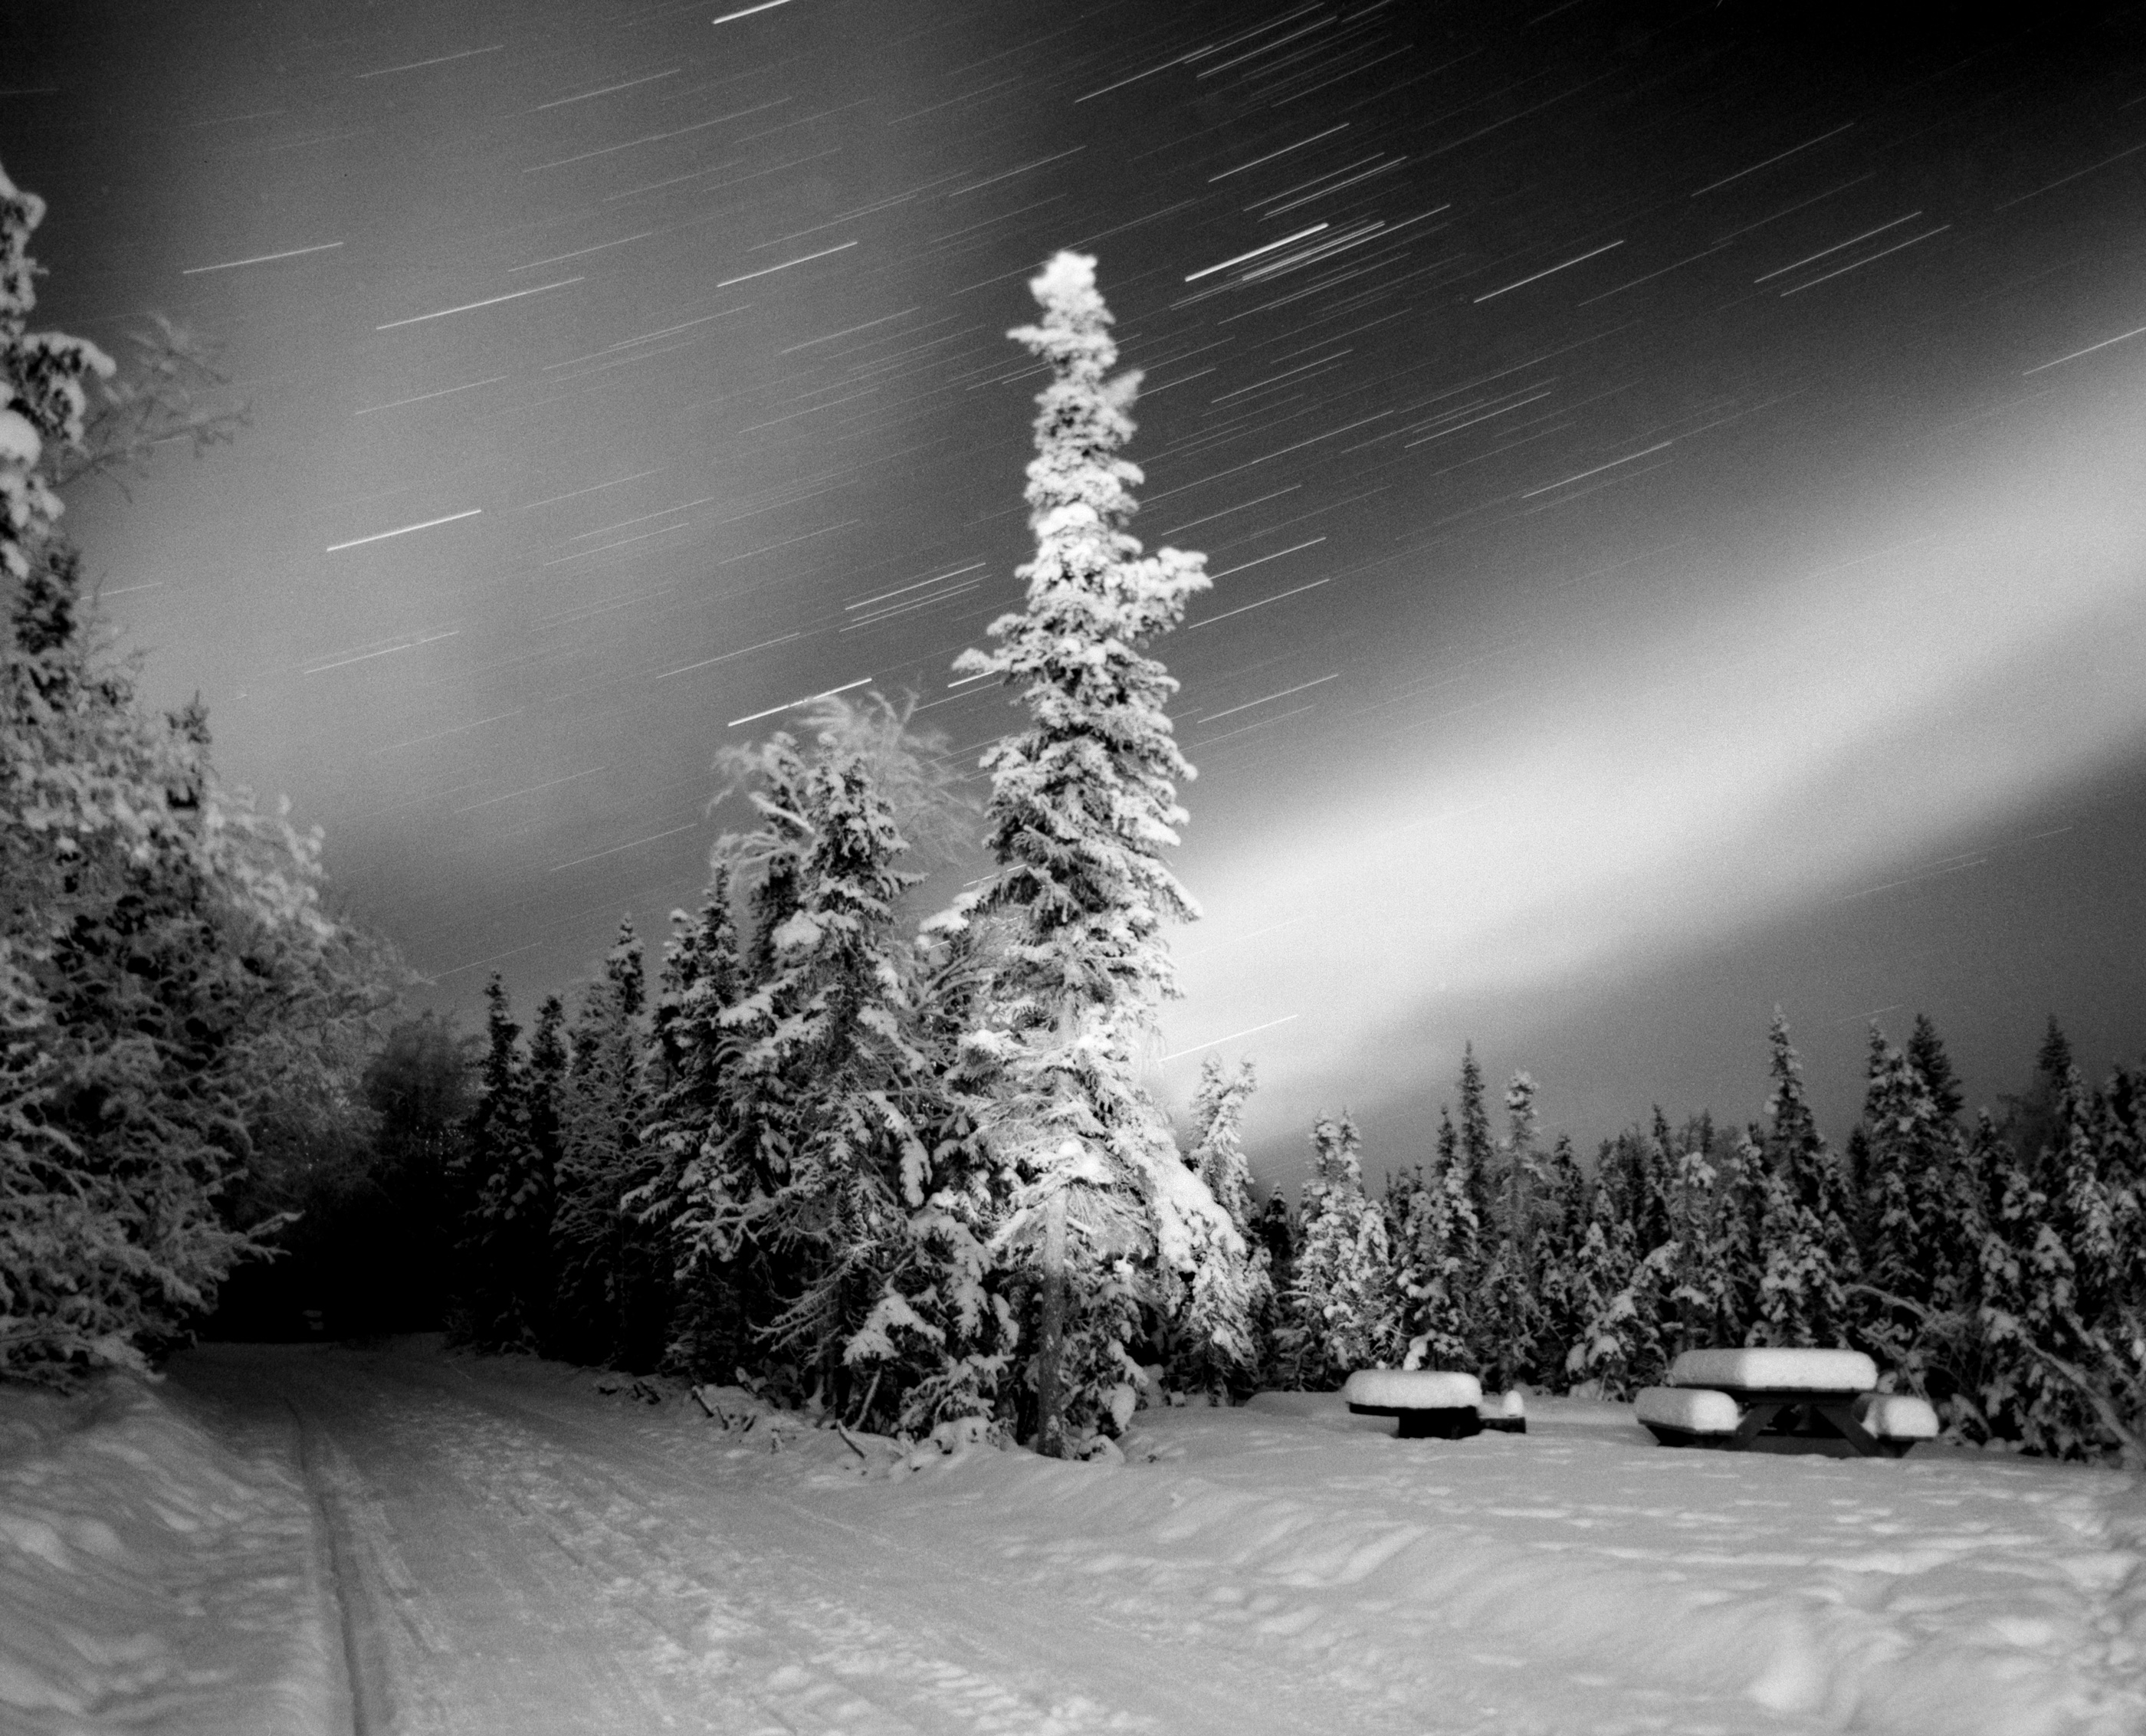
In the Canadian Arctic, we are gifted with the otherwise-evasive Aurora Borealis on almost a nightly basis. On many nights, the spectacle is nothing more than a faint green ribbon in the sky, but on a few lucky occasions, the sight of Aurora in full motion overhead can leave you breathless. I have always been inspired by the challenge of capturing this dancing lightshow with film. One Saturday in early December, the NOAA Ovation/Aurora website was alive with warnings of intensive Auroral activity predicted for the night hours. Naturally I loaded up some HP5+, packed up my camera bag with the necessary gear, and prepared for what would certainly be a long, cold night in the wilderness.
Did you come across any challenges?
There are a myriad of challenges associated with auroral photography on film, mostly revolving around the emulsion reciprocity failures associated with long exposures. A 'metered' exposure time in excess of a few seconds becomes doubled, tripled, or more, causing your resulting calculated exposure time to become excessively long.
A question I often get from other photographers is how do I meter the exposure time in the night? The short answer: I don't. Light meters become rather useless in virtually no-light situations, so calculating exposure comes down to a matter of experience, and, sometimes just plain luck. I've made hundreds of exposures on dozens of rolls of various flavours of film to experiment with what film/exposure/developer combinations work and what doesn't. A good rule I've developed from testing night exposures is simply to always err to the side of over-exposure once you're 'getting above 1 minute territory'. With HP5+, after 1 minute your next stop of exposure won't be until about 4 minutes, and the stop after that will require over 20 minutes.
A long-enough exposure which captures some shadow detail is important, and when you're working with natural lighting from above such as the aurora borealis, it becomes nearly impossible to blow the highlights. Ultimately, I always resolved that HP5+ was the most versatile film for night photography. Despite box speed being only iso 400, and having other offerings with higher speed on the market to choose from, HP5+'s latitude for push-processing is crucial to obtain the most detail with the shortest possible exposure time.
What process did you use
As with any long exposure photograph, a tripod is essential. Preferably one with a ball head to make adjustments easy, however any tripod will work. The exposure time for this photograph was 20 minutes at f4.5, the fastest aperture my 50mm wide angle lens will allow. Generally, I always shoot with wide open apertures at night to allow shortest exposure times, however, in a few rare situations, stopping down may be beneficial for focal depth reasons or full moon-lit scenes needing to be stopped down.
With the camera I used for this image, the Mamiya RB67 ProSD, I opted to trigger the shutter with T-mode (known on some cameras as 'Bulb'). At night, I don't fuss about using my finger to trigger the shutter and causing minor camera shake, because the small amount of vibration is null in the grand scheme of a 20-minute exposure. For exposures shorter than 30-seconds, I'll use a cable.
The foreground illumination in the image was provided by a camp fire some 50 meters behind the camera location obscured behind a row of trees. Though very dim, this light source provided excellent even lighting for the foreground in the scene, and an even better place to stay warm while the 20-minute exposure was happening!
How did you process it?
I am a home developer, and my chemistry of choice has always been Kodak HC110. Like Ilford's HP5+ film, HC110 is an extremely versatile tool, and using this film/developer combo unlocks an infinite array of possibilities of contrast control for achieving the perfect negative. This is especially true for push processing HP5+ to the extremes at iso 3200. With the HC110 syrup at the strongest ratio of 1+15, a 9.5 minute developing time was necessary. I always refer to Ilford's film developing chart to reference times, and have made little to no personal modification to any of the times published on this chart. After developing for 9.5 minutes, I stop the film in Ilford Ilfostop at 1+19 for 1 minute, then fix the film using Ilford Rapid Fix at 1+4 for 6 minutes. Washing the film is done using a 5/15/25 method of filling the tank, inverting 5 times, rinse, repeat 15 times, rinse, repeat 25 times. Finally, a drop of PhotoFlo is used in the final rinse to help the film dry spotless, and then subsequently hung to dry for approximately 2 hours before I cut the film for scanning and then into archival storage sleeves.
What about printing?
Absolutely! I've been an active darkroom printer for a few years, using an Omega D2 enlarger with a diffuser light source in my home darkroom setup. This diffuser light source offers noticeably longer print exposure times than traditional enlarger light sources, allowing more time for creativity in dodging and burning when exposing the print.
Which paper did you use and what was your printing process?
I printed this image on my absolute favourite photo paper, Ilford MGFB Classic Matt. 'Classic' is the best way to describe this paper, it's wonderful surface texture and lack of glare lends the image a stunning, truly 'classic' look. The Matt finish renders beautiful tones across the spectrum, but what I most appreciate about the tonal scale is how this paper handles the blacks, appearing almost a deep charcoal-grey instead of pure black. Very pleasing.
My darkroom printing process has always been to use Multigrade filters for split-grade printing, where a balance of low and high contrast filtration is used across multiple exposures to achieve my envisioned tonal rendition of the print. Being that night photographs are naturally very high contrast, especially since this negative was pushed to iso 3200 and developed using a high-ratio 1+15 dilution, I knew that contrast control would be essential in printing the negative. After a series of test strips to evaluate the desired exposure and contrast, the print was made by exposing 20 seconds through a #0 filter, and 7 seconds through a #4.5 filter. No dodging or burning was used in the print. The chemistry process I use is 90-seconds development in Ilford Multigrade Developer 1+9, then 15-seconds stop in Ilfostop 1+19, then 60-seconds fix in Ilford Rapid Fix 1+4. Washing is performed for 30 minutes in running water, then hung to dry.
After drying, I re-wet the print for 2-3 minutes, and finally tone it with Kodak Rapid Selenium Toner at 1+9 dilution for 5 minutes. Many practices call for toning immediately out of the fixer, however I do not like the red-purple color shift that occurs with KRST in this sequence. I have found that after washing the fixer out, drying, re-wetting, and then toning, the color shift that occurs is subtle and cool, not intensively red-warm. I prefer the cooler shift, as well as the subsequent increase in density (dmax) and archival properties achieved from the Selenium toner. The density increase plays very well with MGFB Classic Matt's tones. After toning, another 30-minute wash is undertaken, and the print is hung to dry in it's final state, ready for mounting, framing, and presentation.
About The Author

Jamie Fitzel
My name is Jamie Fitzel, I am a pilot in the Canadian Arctic and a practitioner of black & white film processing and wet printing. One of the major elements that drives me to photography is the never-ending discovery. Travelling and exploring to discover iconic landscape subjects. Experimenting to discover the perfect developer ratio. Printing to discover the perfect paper. Photography to me, is considerably about chasing that element of discovery, whether it’s found in my studio, a hundred miles away, or just outside my front door.
Originally from the central Canadian Prairies in southern Saskatchewan, I now reside in Norman Wells, Northwest Territories, at the Arctic Circle flying airplanes into the remote desolate wilderness, providing the lifeline that connects the few remaining small communities isolated at these extreme northern reaches of the Boreal Forest. As you can probably imagine, living in the arctic affords some breathtaking photographic opportunities in this epic vastness of a region virtually untouched by mankind.
What are your website / social links?
Website: jfitzel.myportfolio.com
Instagram: flyingmachines_


